
5 Steps to Assess Building Code Compliance Risks
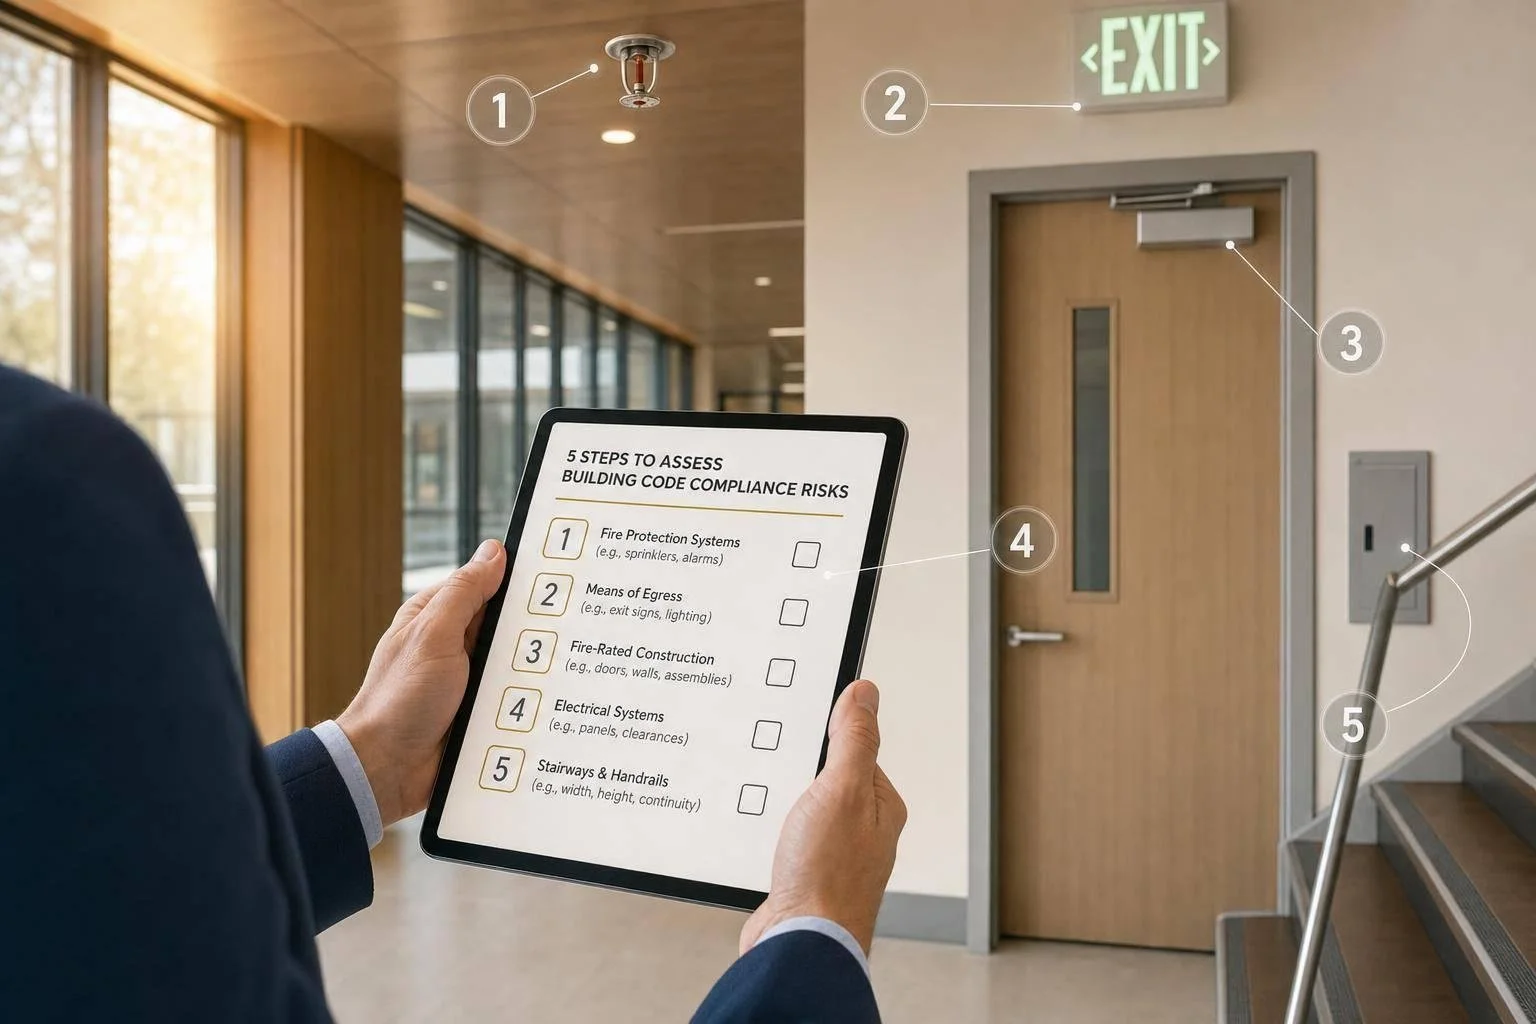
Code problems can cut a deal fast. In U.S. commercial real estate, a missing certificate of occupancy, open permit, or fire/life-safety issue can lead to repair costs, lender holdbacks, insurance delays, or closing trouble.
Here’s the core idea in plain English: I need to check five things before I trust a property’s code status:
- Which codes and local rules apply
- Whether the current use matches the approved use
- Which building systems and records show risk
- What the fixes may cost, and when they hit cash flow
- Who owns each next step before closing or refinance
This process helps me move from code questions to deal numbers. It also helps me sort issues into three buckets: fix now, budget soon, or plan later. In many cases, even one open life-safety item can push costs into the tens or hundreds of thousands of dollars.
Quick comparison
| Step | What I check | Why it matters |
|---|---|---|
| 1 | Codes, editions, local agencies, overlays | Rules change by city and county |
| 2 | Occupancy, use, construction type, CO match | A use change can trigger upgrades |
| 3 | Egress, fire systems, ADA items, structure, permits | Physical and record gaps both create risk |
| 4 | Cost, timing, reserves, escrow, deal effect | Findings need to fit the underwriting |
| 5 | Owners, due dates, AHJ follow-up, closing terms | Open items need action, not just notes |
If I’m buying, refinancing, or planning work, this five-step review gives me a simple way to spot code risk early and tie it to price, timing, and closing terms.
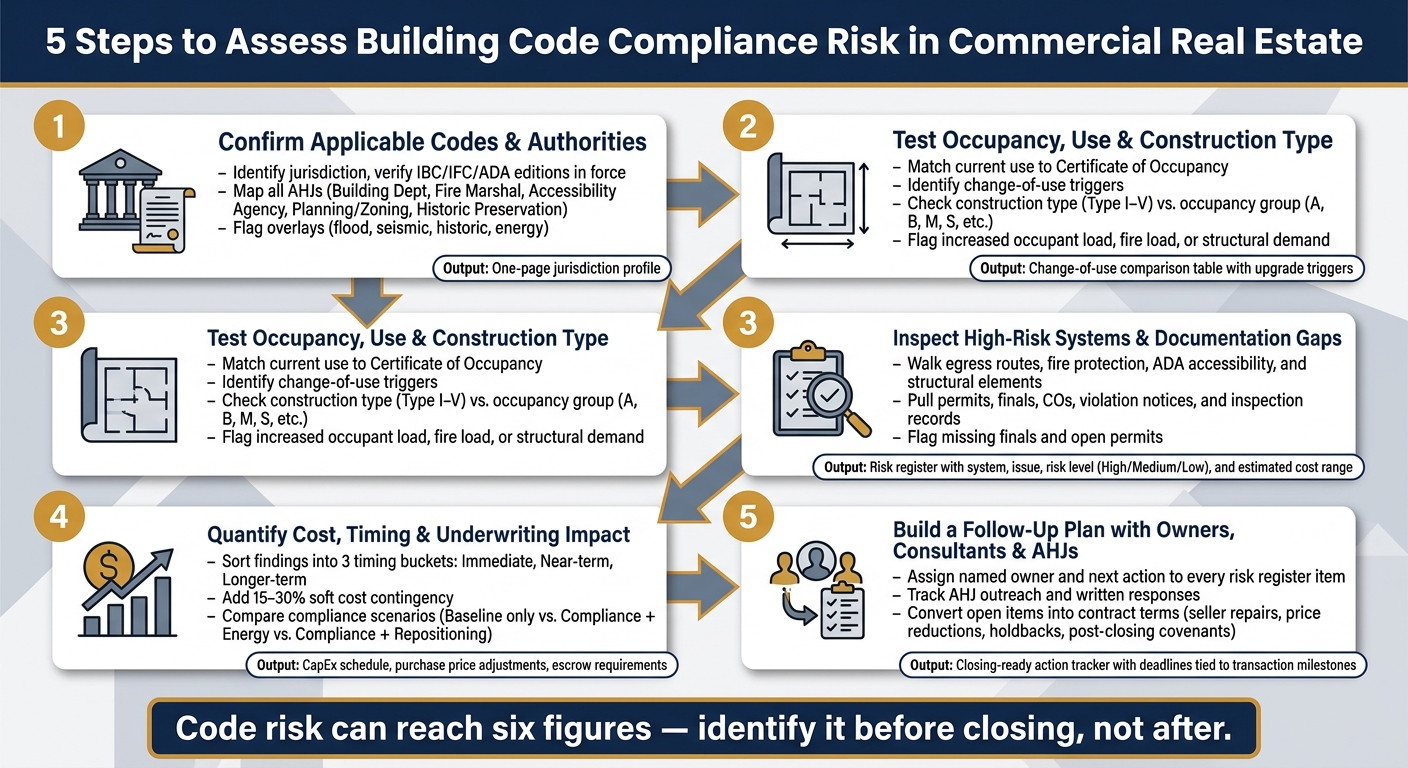
5-Step Building Code Compliance Risk Assessment for Commercial Real Estate
Step 1: Confirm Applicable Codes, Editions, and Local Authorities
Start by confirming the property's jurisdiction. A site inside city limits can fall under one set of rules, while the same address in a county or unincorporated area may follow another. If you get the jurisdiction wrong, everything that follows can drift off course: scope, cost, and timeline. This step sets the baseline for every later compliance call.
Verify the Code Set in Force
IBC adoption changes by state and by local jurisdiction. Record the adopted edition of the IBC, IEBC, IFC, IECC, and any accessibility standards that apply. Include the 2010 ADA Standards and any state accessibility standard in force. A shift in edition can change fire, structural, energy, accessibility, and upgrade rules.
Pull the local amendment ordinance that shows all local changes to the state baseline. The local building department website is usually the best starting point. Many departments post a “codes in effect” page or something close to it. State fire marshal and building code authority websites also often post code adoption maps that show edition years by jurisdiction.
It also helps to pull the original building permit and any major renovation permits tied to the property. Those records often show the edition the building was designed and inspected under. That’s a strong clue about the starting point for your review.
Identify the Relevant AHJs and Special Overlays
Most properties deal with more than one authority having jurisdiction, or AHJ. That can include building, fire, accessibility, planning, and historic preservation. In some states, accessibility enforcement sits with a separate agency. Each AHJ has its own lane, contact list, and process for variances or alternate methods.
You’ll also want to screen for flood, historic, seismic, and local energy or emissions overlays. These can add permit steps, review layers, or upgrade triggers. Use GIS and zoning maps to spot overlay zones, then check FEMA flood maps and any local sustainability laws that may apply.
Put the results into a one-page jurisdiction profile. Keep it simple and usable. It should list the governing codes, edition years, AHJ contacts, and any active overlays.
| AHJ | Scope | Key Records to Request |
|---|---|---|
| Building Department | Permits, plan review, Certificates of Occupancy | Certificate of Occupancy history, permit logs, open violations |
| Fire Marshal | IFC enforcement, fire protection systems | Sprinkler/alarm certifications, inspection reports |
| Accessibility Agency | ADA and state accessibility compliance | Compliance reviews, barrier removal records |
| Planning/Zoning Office | Zoning classification, overlays, variances | Zoning verification letter, overlay district maps, variance approvals |
| Historic Preservation Commission | Exterior and, in some cases, interior alterations in historic districts | Certificate of appropriateness, district boundaries |
Attach that jurisdiction profile to the due diligence file.
With the governing codes and AHJs pinned down, Step 2 checks whether the property's use or construction type triggers upgrades.
sbb-itb-df8a938
Step 2: Test Occupancy, Use, and Construction Type for Upgrade Triggers
After Step 1, check whether the building’s current use lines up with the Certificate of Occupancy.
Match Current Use to Approved Occupancy and Certificates
Start by pulling the current Certificate of Occupancy and comparing it, line by line, with what’s actually happening in the building. The CO spells out the approved occupancy group, maximum occupant load, number of stories, and any special conditions. If the building has been re-tenanted, renovated, or repurposed since that CO was issued, the approved use may not match present-day conditions.
Under the IBC, occupancy groups come with specific life-safety thresholds. A Group B (Business) office floor does not follow the same egress, sprinkler, and fire-separation rules as a Group A-2 (Assembly) restaurant or bar. That gap matters. If a tenant turns a permitted retail space into an event venue, or a landlord allows cooking in a space built for general office use, the building may now be operating under a different occupancy classification than the one on file.
Flag any use that increases:
- occupant load
- fire load
- accessibility demand
- structural demand
Then check whether the construction type, from Type I–V, can support the use, height, and area. A more hazardous occupancy in a combustible construction type can shrink allowable floor area and trigger fire barriers or compartmentation that were never part of the original design.
Grandfathered status can fall away fast. A change of occupancy, a major renovation, or an AHJ review that points to higher life-safety risk can trigger upgrades.
Map Change-of-Use Impacts with a Comparison Table
Map each mismatch to its code trigger before you assign cost and responsibility.
| Existing Conditions | Proposed Use | Code Requirement | Potential Upgrade Needed |
|---|---|---|---|
| General retail (Group M) | Restaurant/bar (Group A-2) | Higher occupant load factor; cooking equipment hazard | Additional exits, wider egress paths, hood suppression system, expanded sprinkler coverage, grease trap |
| Traditional office (Group B) | High-density coworking with event space (Group A) | Increased occupant load; egress reconfiguration | Added exit capacity, updated emergency lighting |
| Light storage warehouse (Group S-1) | High-piled combustible storage with racking | Altered sprinkler design density; structural live load review | In-rack sprinklers, commodity reclassification, structural reinforcement |
| Professional office (Group B) | Medical clinic (Group B, higher plumbing/accessibility demand) | Accessibility routes, plumbing fixtures, corridor widths | Hands-free fixtures, wider corridors, accessible restroom upgrades |
| Vacant shell | First occupied tenant use | Occupancy change compliance review triggered | Egress, fire protection, accessibility, and structural review required |
Tie each row to a cost estimate and an owner for Step 4 underwriting. Then use those triggers to narrow the system and document review in Step 3.
Step 3: Inspect High-Risk Systems and Documentation Gaps
Inspect the building first, then check the permit trail. Once you've confirmed the use trigger in Step 2, focus on the systems most likely to fail a code review. The goal here is simple: use the walkthrough and the records review to separate must-fix-before-closing items from longer-range capex.
Review Life Safety, Fire Protection, Accessibility, and Structure
Walk each floor and review life safety, fire protection, accessibility, and structure. For each item, compare what you see to the code that applies, take short notes and photos, and assign a risk level: low, medium, or high.
Start with egress. Check exit count, travel distance, dead-end corridors, door swing, and emergency lighting against the governing code. If an exit is blocked or undersized, flag it right away.
Then move to fire protection. Look at sprinkler heads for damage, paint overspray, or missing coverage in areas that were recently built out. Review fire alarm panels, horn/strobe devices, fire department connections, fire-rated doors and assemblies, and fire-stopping at penetrations.
Accessibility issues can be easy to miss on a fast walkthrough, but they matter. Flag steep ramps, narrow doors, noncompliant restrooms, missing tactile signs, and inaccessible parking. Also verify two accessible means of egress on floors with accessible spaces.[2]
For structure, pay close attention to warning signs that can turn into major work. Look for cracking in load-bearing elements, sag in beams or floor slabs, corrosion on exposed steel, brick spalling, and signs of water intrusion near structural connections. These issues often need an engineering review and can lead to large capital costs.
Check Permits, Inspections, Violations, and Missing Finals
A building can look fine in person and still carry major legal risk if the paperwork is a mess. Pull the records below and confirm the status of each one:
- Original building permits and major renovation permits, including mechanical, electrical, plumbing, and fire protection work
- Final inspection sign-offs from building, electrical, mechanical, plumbing, and fire departments
- Current Certificates of Occupancy for each building, floor, or major use
- Fire inspection reports and test records for sprinklers, alarms, and standpipes
- Open violation notices, orders to correct, and enforcement history
- Required special inspection records, including elevator certificates, structural special inspections, and any façade inspection reports required by local law
Missing finals are a red flag even when the building looks fine on the surface. Using a building without final inspection approval or a CO can trigger fines, stop-use orders, or permit revocation.[3][5][7] A permit that was issued but never closed out is still an open compliance problem.[4][5][6] Lenders and buyers often treat unresolved code issues and missing COs as defects in the asset's legal status. That can lead to cures, escrow holdbacks, or price cuts at closing.[7][1][8]
Use a Risk Register and Documentation Status Table
Put every finding into one register so the highest-risk items flow straight into underwriting. Each entry should name the system or document type, describe the issue or missing record, cite the code section or record gap, assign a risk level, and include a rough cost range.
| System / Document Type | Observed Issue | Code/Record | Risk Level | Estimated Cost Impact |
|---|---|---|---|---|
| Life Safety | Blocked emergency exits; dim lighting | IBC Means of Egress | High | $2,000–$5,000 |
| Fire Protection | New TI area not fully sprinklered | NFPA 13 coverage requirements | High | $75,000–$150,000 |
| Fire Protection | Expired extinguisher tags; missing inspection records | NFPA 25 / Local Fire Code | Medium | $5,000–$15,000 |
| Accessibility (ADA) | Non-compliant restroom grab bars; steep ramp | 2010 ADA Standards | Medium | $2,500–$7,500 |
| Structural | Hairline cracking in column at gridline C5 | IBC Structural / Engineering review required | High | $50,000+ |
| Certificate of Occupancy | Current use differs from CO-listed use | Zoning / Land Use Code | High | $10,000–$30,000 |
| Permit History | 2022 HVAC permit lacks final sign-off | Municipal permit file | Medium | $1,000–$5,000 |
Keep the cost ranges broad. This step is for flagging exposure, not pricing the work in detail. Items marked high should move straight into Step 4 underwriting as possible immediate needs. Medium items usually shape short-term capital planning. Step 4 translates these findings into cost, timing, and underwriting impact.
Step 4: Quantify Cost, Timing, and Underwriting Impact
Now turn the Step 3 risk register into numbers a lender can actually use. The timing buckets help you decide what needs to be fixed before closing, what belongs in reserves, and what can sit in a later CapEx plan.
Estimate Remediation Costs and Prioritize by Urgency
Start by placing each Step 3 item into one of three timing buckets:
- Immediate (0–12 months): Cure before close
- Near-term (12–36 months): Reserve-funded CapEx
- Longer-term (36+ months): Strategic upgrades
Immediate items usually need to be fixed before closing or backed by escrowed funds. Lenders often want these issues cured before closing or escrowed at 100% to 125% of the engineer's estimated cost, and that money is often funded from loan proceeds. [9][10]
Near-term items can include out-of-service fire alarms, noncompliant guardrails, or partial upgrades set off by a planned renovation. These usually roll into a 3- to 5-year capital plan with separate CapEx line items and expected timing.
Longer-term items are more like big-picture projects: deep energy retrofits, seismic or wind-load work, or major elevator and vertical transportation modernization. These are often tied to a repositioning plan or a refinance timeline.
For pricing, use contractor ROMs, PCA findings, and local benchmarks. Then add 15% to 30% for soft costs and contingency. That extra layer matters. A fix that looks manageable on paper can get a lot more expensive once permits, design fees, and field surprises show up.
Compare Baseline Compliance Against Broader Upgrade Scenarios
Minimum compliance keeps the property legally occupiable, but scope still drives cost, timing, and deal math. Before you lock in a plan, compare at least two or three paths side by side.
Take a 250,000 SF suburban office built in 1985 with outdated fire alarms, partial sprinkler coverage, and noncompliant ADA features. A few practical options might look like this:
| Scenario | Upfront CapEx (USD) | Downtime & Disruption | Underwriting Impact |
|---|---|---|---|
| A: Baseline compliance only | $2.0M–$2.8M | Limited; phased work during off-hours, focused on common areas | Preserves legal occupancy and current NOI; limited rent upside |
| B: Compliance + energy performance | $3.5M–$4.5M | Moderate; more invasive HVAC and lighting work | Lower operating expenses; potential for green certifications and modest rent premium |
| C: Compliance + repositioning | $6.0M–$8.0M | High; lobby/elevator work, potential floor closures, major tenant disruption | Higher rents, better tenant mix, improved exit cap rate and asset marketability |
This kind of side-by-side view helps you see the tradeoffs fast. Scenario A may protect current cash flow with less disruption. Scenario C costs far more up front, but it may change the leasing story and the exit.
Connect Findings to Financial Analysis and CoreCast Workflow
Once you pick a scenario, push it straight into the deal model. That means turning the scope into purchase-price adjustments, reserves, and a phased CapEx schedule.
The Fractional Analyst can translate code findings into underwriting and lender reporting; CoreCast can centralize findings, documents, and deadlines.
Step 5: Build a Follow-Up Plan with Owners, Consultants, and AHJs
After Step 4 puts numbers and timing around the work, Step 5 answers a simple question: who does what, and by when? This is the point where the risk register stops being a reference document and starts working like an action plan that carries all the way to closing.
Assign Responsibilities and Next Actions
Every item in the Step 3 risk register needs two things: a named owner and a clear next step. In most deals, the roles break out like this:
- The owner or buyer approves the budget
- The property manager gathers records
- The architect or code consultant interprets findings
- The fire protection engineer checks life-safety systems
- The contractor prices repairs
- The attorney handles legal issues and closing conditions
If the property may need permits or variances, the consultant or attorney should also work with the AHJ.
The next action should fit the issue. A records gap calls for permit files and final sign-offs. A suspected life-safety problem calls for field verification by a qualified consultant. An accessibility gap calls for an ADA or code survey. A physical fix calls for scope development and contractor pricing. If the issue ties back to a change of use or a recent alteration, review the approved occupancy and permit history to see whether an upgrade trigger applies.
Once each issue has an owner and a next step, put it in the tracker.
Track Deadlines, AHJ Responses, and Closing Conditions
Use a tracker with columns for issue description, responsible party, next action, due date, status, and closure evidence. Each deadline should tie to a real transaction milestone, such as the end of the diligence period, the lender underwriting deadline, the insurance submission date, or the expected closing date. That keeps the follow-up plan lined up with the cost and timing work from Step 4.
Track AHJ communication on its own line of record. Log the jurisdiction, contact person, date of outreach, questions submitted, and any response received. Written AHJ confirmation can affect occupancy, financing, and timing. If noncompliance is not corrected after written notice, the building official may issue a stop-work order until correction is documented. [11]
On the deal side, unresolved items should turn into plain contract terms: seller repair obligations, price reductions, holdbacks, or post-closing covenants. Lenders may ask for a compliance consultant report, a remediation plan, or an escrow before funding. Insurers may want proof that material life-safety or occupancy issues are being addressed before they bind coverage. The tracker should carry those open items straight into closing conditions, escrow terms, or post-closing covenants.
Conclusion: A 5-Step Checklist for Repeatable Code Risk Review
Use this checklist as a repeatable workflow from code review to underwriting to follow-up. It starts with the codes that govern the property and ends with action items someone can own. Code risk doesn’t sit still, so this checklist should be part of recurring diligence.
The value of the process shifts by stage, but the workflow stays the same.
Key Takeaways for Due Diligence and Asset Management
Apply the checklist a bit differently across the deal and hold cycle.
Before closing, use it to spot credits, seller cures, escrows, and closing conditions. Remediation costs can easily reach six figures, so you want that priced in before the deal closes.
During redevelopment, run Steps 2 and 3 early in concept design. Why so early? Because major renovation thresholds can trigger full-building upgrades. If that risk is there, it’s better to find it on paper than in the middle of the project.
For portfolio management, use a shorter version of Steps 2 through 5 once or twice a year. That keeps code risk in view right alongside leasing and operations data. Use CoreCast to track tasks, dates, and budgets, and use The Fractional Analyst for underwriting and scenario analysis.
Code compliance is both an operating cost and a deal variable.
FAQs
What usually triggers a code upgrade?
A code upgrade usually kicks in after major property damage, especially when repair costs go past 50% of the building’s value. At that point, rebuilding often has to meet current code.
Upgrades can also be triggered by renovations, expansions, and, in some cases, maintenance or improvement work. If the property no longer meets current rules for safety, electrical systems, zoning, fire safety, ADA access, or infrastructure, the work may need to bring it up to today’s standards.
Can a property be occupied with an open permit?
No. In most cases, a property can’t be legally occupied if there’s an open permit.
A Certificate of Occupancy is usually required to show that someone has the legal right to live in or use a building.
An open permit can be a red flag. It may point to unfinished work, failed or missing inspections, or code issues that still need to be fixed. Any of that can affect whether the certificate is valid.
For buyers and investors, the smart move is simple: check the permit history and make sure all approvals have been signed off and closed.
Who should handle code issues before closing?
Who handles code issues before closing should be spelled out in the purchase agreement’s contingency clauses. In most cases, the buyer and seller work that out during negotiations.
Have legal counsel review the language closely. Also bring in architects, engineers, or code compliance experts to inspect any violations and help you decide whether the seller should fix the issues before closing or whether the purchase price should be reduced instead.