
Survey Review Tips for Property Line Adjustments
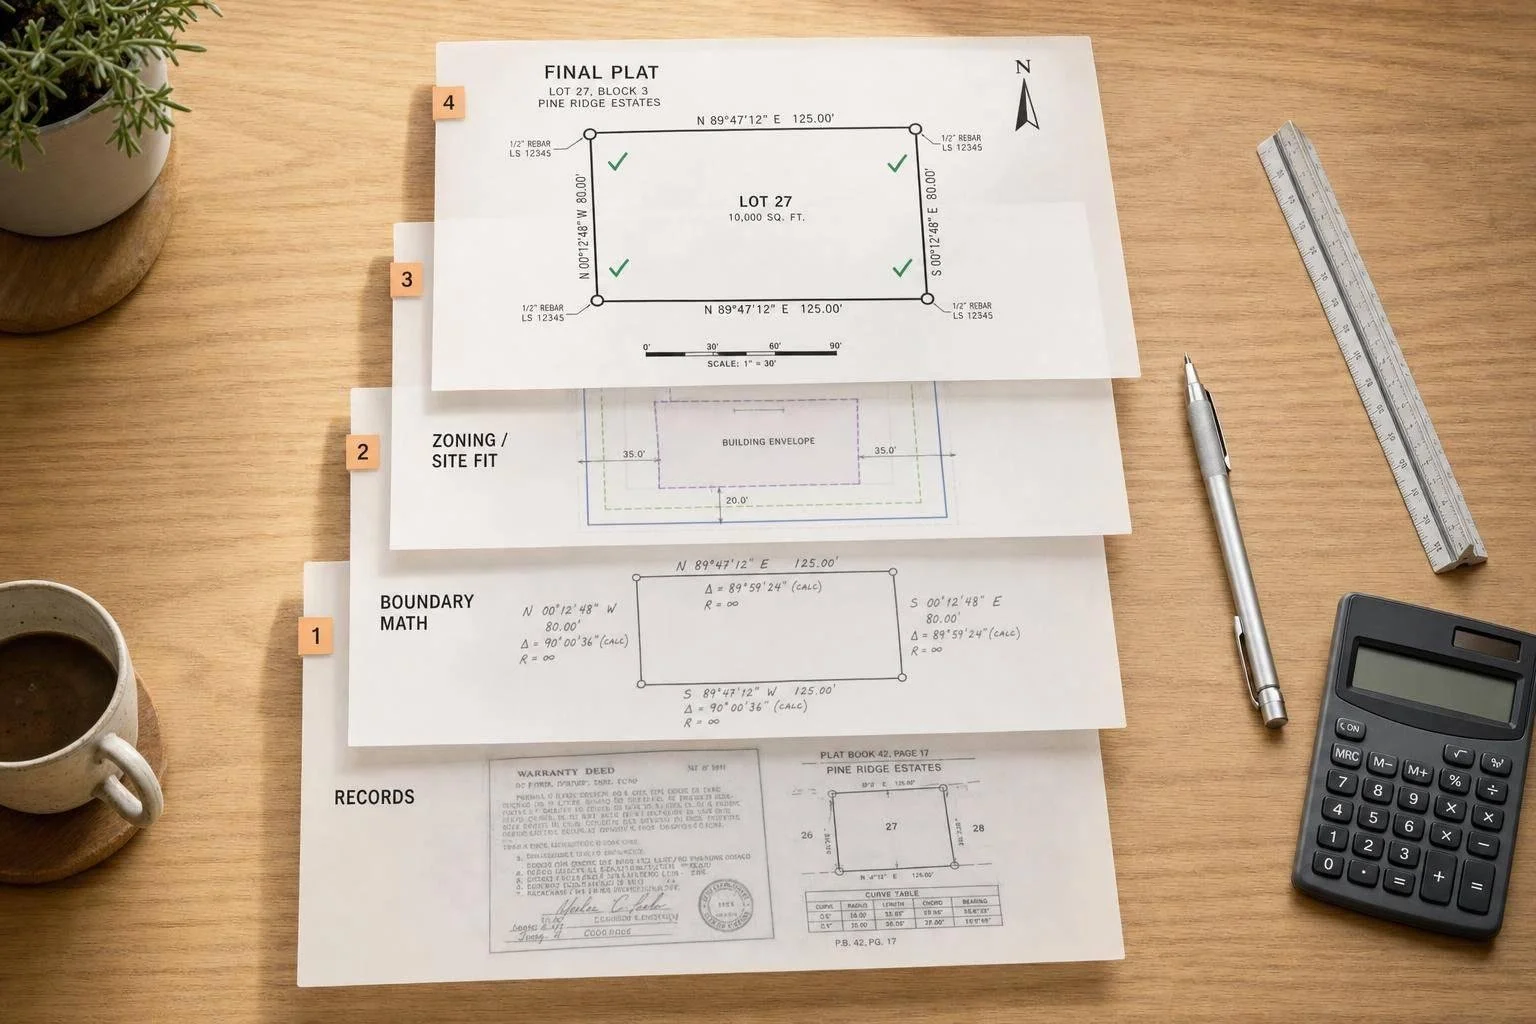
A property line adjustment can fail for just a few reasons: bad legal descriptions, zoning misses, easement conflicts, or survey errors. If I were reviewing one, I’d focus on 4 checks first: records, boundary math, site limits, and final paperwork.
Here’s the short version:
- Match the survey to the deed and title file. If names, bearings, distances, or easements don’t line up, recording can stall.
- Test the new line against zoning. Lot size, frontage, depth, and setbacks still have to work after the shift.
- Check the ground conditions. Fences, driveways, utility lines, wells, septic areas, and access routes can all create problems.
- Make sure every final document says the same thing. A draft exhibit or old legal description can delay closing.
A few facts stand out. A PLA changes boundaries but does not create a new lot. And even a small line move can affect 100% of the parcel’s legal description, title review, and lender review. That’s why I’d treat survey review as a closing issue, not just a mapping task.
If you want a simple way to think about it, the job is this: check the paper, check the math, check the site, then check the final set one more time.
| Review area | What I’d verify | Main risk if missed |
|---|---|---|
| Records | Deeds, title, vesting, prior plats, easements | Recording delays, title exceptions |
| Boundary data | Monuments, bearings, distances, closure, curve data | Bad legal description, boundary disputes |
| Zoning and site fit | Lot size, frontage, setbacks, access, utilities | Denial, nonconforming parcels |
| Final document match | Deed, survey, approval set, recorded exhibit | Rejection at closing or recording |
Below, I’ll walk through the main review points in plain English so you can spot issues before approval, recording, or closing.
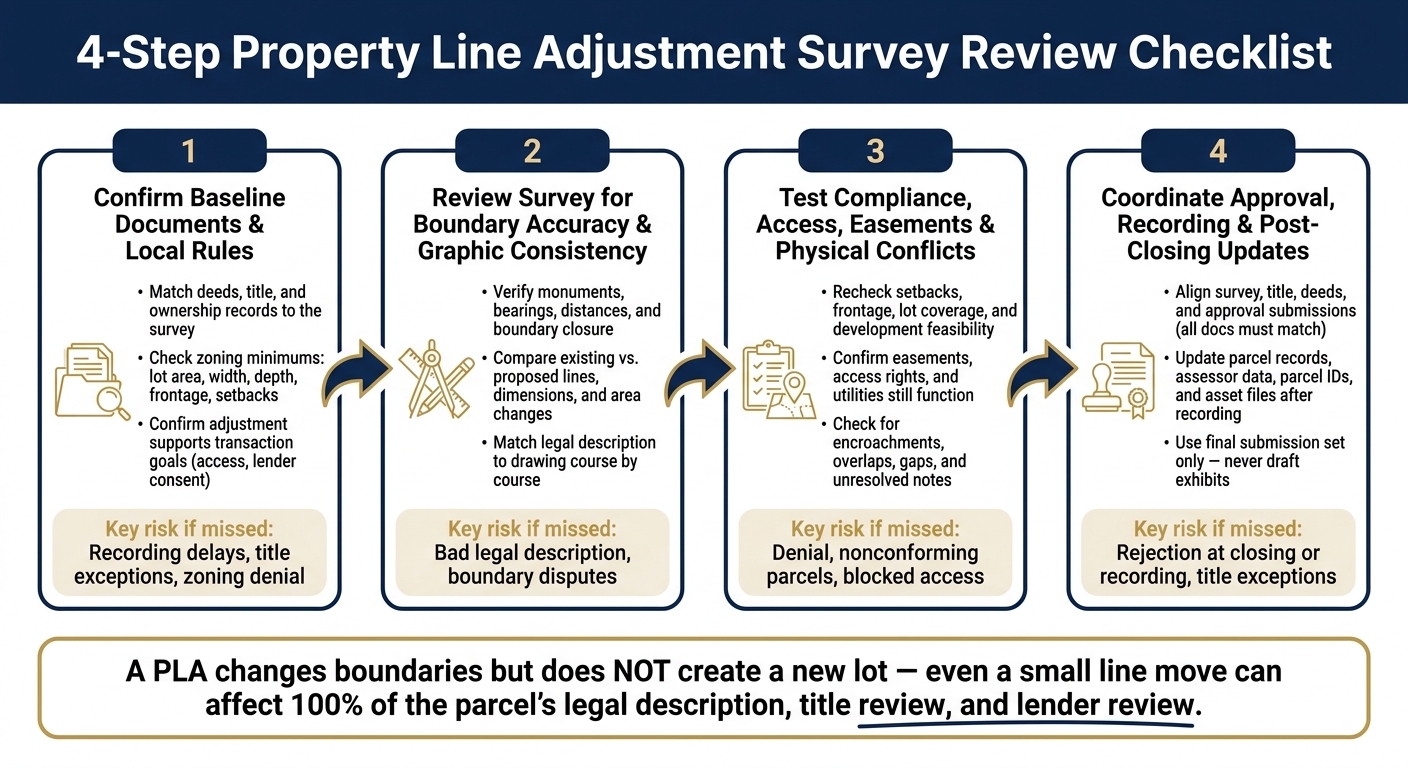
4-Step Property Line Adjustment Survey Review Checklist
Step 1: Confirm the baseline documents and local rules
Match deeds, title, and ownership records to the survey
Once you’ve assembled the file, begin with the record documents that control the parcel. Put the vesting deed, title commitment, plats, prior surveys, and assessor records next to the survey before you even look at the proposed adjustment [2][5][6].
Go through the deed legal description line by line and compare it to the survey. Make sure the bearings, distances, and call-outs match. Then review the title commitment for recorded easements, liens, and other encumbrances [2]. If the survey leaves out an easement shown in title, fix that conflict before submission.
Use tax parcel maps for orientation only. They are not enough to confirm boundary location.
It’s also smart to check the vesting owner names on the survey against the current vesting. Even a small name mismatch can slow down recording, especially if ownership changed not long ago [2][5].
Check zoning and lot standards before reviewing the proposed line
After the record documents line up with the survey, pull the zoning code that applies before you study the proposed boundary. The adjustment needs to work as a legal matter before it works on paper.
Confirm the minimum lot area, width, depth, frontage, and setback rules for each parcel [6][9]. If the new line leaves a parcel under the minimum lot size, the adjustment may be denied. And once the line moves, any existing structures - garages, sheds, wells, and septic systems included - still need to meet setback rules [8][1].
You should also confirm which local planning or zoning office has to approve the adjustment. Some proposals can move through a faster staff-level review, while others need a full hearing [7][8].
Confirm the adjustment supports the transaction goals
Clearing zoning is only part of the job. The boundary change also has to make sense for the deal itself. Compare the proposed adjustment with access drives, building footprints, and recorded utility or access easements. If the new line cuts across an easement or blocks access, it may create a new headache instead of fixing one [3][8].
If there’s a mortgage on the property, get lender consent early. The collateral is changing, and that can’t wait until the last minute [6][8].
After the record check is done, move on to the boundary geometry and the area changes.
sbb-itb-df8a938
Lot Line ADJUSTMENT: 7 Things You Need to Know
Step 2: Review the survey for boundary accuracy and graphic consistency
Once the record documents line up, check the survey geometry itself.
Verify monuments, bearings, distances, and boundary closure
Start with the physical monuments. Every found or set corner monument shown on the drawing should have a clear label and a symbol that matches the legend. Ask for photos of each monument and control point.
You also need to know what north reference the survey uses. Say whether the bearings are tied to true, magnetic, or grid north so the drawing can be checked against the legal description.
Next, review the closure report. Get the actual numerical closure ratio instead of relying on a vague note like "acceptable." If the boundary does not close back to the point of beginning, the survey needs to be fixed before closing.
Watch for any boundary lines marked "tentative" or "unresolved." Those labels usually mean the data is still unsettled, and that needs to be sorted out before closing [4].
If the linework closes, shift from geometry to compliance.
Compare existing and proposed lines, dimensions, and area changes
Overlay the proposed line on top of the existing linework and trace every dimension that changes. That includes line lengths, angles, frontage widths, and parcel depths. For each parcel, list:
- Existing area
- Proposed area
- Key dimension changes
- Zoning minimums
- Compliance status
Use assessor acreage only as a quick sanity check [2].
Then compare the proposed legal description to the drawing, line by line. Each course in the legal description should match the plotted line. Every bearing, distance, curve radius, arc length, and chord bearing in the text needs to match what appears on the exhibit [2][4].
Common trouble spots include:
- Omitted calls
- Bearings that don't match
- Parcel labels that were swapped
- Deeds that point to an older survey exhibit instead of the final version sent in for approval
On curved or other non-linear boundaries, check curve radius, arc length, and chord bearing for exact matches [4].
Once the geometry is clean, move to setbacks, easements, access, and site conflicts.
Step 3: Test compliance, access, easements, and physical conflicts
With the geometry locked in, the next job is simple: make sure the new line doesn’t create zoning, access, or physical conflicts. In plain English, the boundary may look fine on the survey, but it also has to work on paper and on the ground.
Recheck setbacks, frontage, lot coverage, and development feasibility
Run the zoning numbers again for each parcel touched by the line shift. That means recalculating setbacks for every affected structure, along with frontage, lot coverage, and minimum lot size after the adjustment.
Check these items both before and after the change:
- Primary setbacks
- Lot coverage
- Frontage width
- Minimum lot size
If the adjustment drops a parcel below the legal minimum for its zone, the request can be denied [6]. If the new line creates any nonconforming condition, flag it right away. The building may stay where it is for now, but nonconforming status can lead to costly zoning review during later renovations or after a casualty loss [3].
If the numbers don’t work, fix the survey before the file moves to approval and recording.
Confirm easements, access rights, and utilities still function
A property line adjustment does not wipe out recorded easements. Power, water, drainage, and access rights stay with the land, and the new layout has to respect all of them [8][3].
Treat recorded easements as controlling. Cross-check access, utilities, and drainage against the survey so the new line doesn’t block, cut off, or interfere with them.
Match the title commitment’s Table B easement callouts to the survey graphic. Then confirm that no utility or drainage easements run under proposed building footprints or through key parking and loading areas [3]. Pay close attention to parcels that rely on a private easement for access [3].
Check for encroachments, overlaps, gaps, and unresolved notes
Review the survey drawing for fences, walls, paving, and outbuildings that cross or come close to the new boundary. These issues can stop approval, recording, or closing [3]. If a line has been unclear for years but both sides have treated it as settled, talk with legal counsel about a possible boundary-by-acquiescence claim before moving ahead [8].
Also look for unowned slivers and overlaps, where two parcels claim the same ground [2][3]. These problems show up often in assembled parcels, older plats, and dense urban areas [3][1]. Any survey note that flags an encroachment, gap, overlap, or similar issue should lead to a revision request for the surveyor, title team, or legal counsel before the file moves forward.
Once those site checks come back clean, send the corrected survey into approval and recording.
Step 4: Coordinate approval, recording, and post-closing updates
Once the survey passes the compliance checks from Step 3, the job becomes coordination. This is where small document mismatches can trip up a closing or create title problems later.
Keep survey, title, deeds, and approval submissions aligned
Before anything goes in for approval or recording, make sure the survey legal description matches the deed, title commitment, and approval set. At this point, the focus is simple: all documents need to say the same thing. This step isn't about boundary review. It's about consistency. If the wording doesn't line up, you can end up with title exceptions or a rejected recording.
Go through the deed description line by line and compare it against the survey. If you spot differences, send them to both the title company and the surveyor so they can fix them [2][10]. When older wording makes an exact match hard, have title note the equivalency on Schedule A or issue a Same as Survey endorsement [10]. And use the final submission set, not draft exhibits, for this check.
Update parcel records and asset files after recording
After the documents are recorded, the focus shifts from closing prep to record cleanup. In plain English: now you make sure every downstream record reflects the new boundary.
Update the title policy, conveyance deeds, assessor records, parcel IDs, acreage, and any lease, site plan, or rent roll references affected by the change [4][10][2].
Conclusion: The review points that prevent delays and boundary disputes
A disciplined four-step process - baseline documents, survey geometry, compliance checks, and final document alignment - is what keeps property line adjustments moving cleanly through recording.
FAQs
Do I need a new survey for a property line adjustment?
Yes, in most cases, you’ll need a new survey for a property line adjustment. Local planning and zoning offices usually want a current boundary survey from a licensed land surveyor before they’ll approve and record the change.
They generally won’t accept rough sketches, old maps, or verbal agreements. A professional survey helps show that the adjustment meets zoning, setback, and access rules. It can also help you avoid delays and future disputes.
Can a property line adjustment make a lot nonconforming?
Yes. A property line adjustment can create a nonconforming lot if the new lot dimensions break local zoning rules.
After the adjustment, each parcel still has to meet standards like minimum lot size, frontage, setbacks, and legal access. If the change pushes a property below those limits, or leaves it without the access the local code requires, the application will likely be denied.
What documents should match before recording?
Before recording, make sure the legal descriptions match exactly across the survey map, deeds of conveyance, title insurance commitment, and real estate contract. If you spot any mismatch in measurements, bearings, or call-outs, fix it first. Even a small gap here can turn into a big headache later.
You’ll also want to confirm that the survey shows all encumbrances, appurtenant easements, and other title matters. On top of that, check that the surveyed acreage, improvements, and encroachments line up with tax records and what the title policy is expected to cover.